Please check that you have selected the correct firmware architecture for your device
Please check that you have selected the correct firmware architecture for your device
Enumerate com port failed
Внимание: Обновление ПО Elari FixiTime 3 возможно только на ПК с ОС Windows: XP или более новой версии.
. Распакуйте архив «ПО_FT301_K7C_v3.9» в отдельную папку (кликните правой кнопкой мыши на архив и выберите пункт «Извлечь файлы…»)
Обновление Elari FixiTime 3, модификации K7C, версия 3.9
Внимание: перед началом обновления ПО убедитесь, что:
– Фотографии перенесены с Elari FixiTime 3 на другой носитель (например, на ПК)
– Elari FixiTime 3 выключены и не подключены к компьютеру;
– SIM-карта извлечена.
1) Перейдите в папку FlashTool_v5.1640.00 и откройте файл Flash_tool.exe.
2) Выберите вкладку Options и убедитесь, что опция USB Download/Readback отмечена галочкой как на картинке:
3) Кликните на значок Download Agent и в открывшемся окне выберите файл CUSTOM_AllInOne_DA_20170526.bin
4) Кликните на значок Scatter/Config File. В появившемся диалоговом окне выберите из папки K7C_2503A_FOREIGN_RU_V3_9_OTA_2018020803 файл ULTRA2503A_11C_BB.cfg
5) Кликните на значок Download.
6) Подключите Elari FixiTime 3 к компьютеру с помощью USB-кабеля.
7) Процесс обновления ПО начнется автоматически (строка состояния в нижней части окна приложения начнет заполняться – как на картинке ниже).
ПРИМЕЧАНИЕ:
– Если часы разряжены, процедура обновления начнется с небольшой задержкой
– При низком заряде аккумулятора часов процесс обновления может прерваться. В этом случае необходимо еще раз кликнуть на значок Download, а затем переподключить Elari FixiTime 3 к ПК
8) Если появится сообщение, как на картинке ниже, нажмите ОК.
9) На экране компьютера появится диалоговое окно (как на картинке ниже). Выключите часы и отсоедините их от компьютера.
10) Кликните на значок Format. В открывшемся диалоговом окне выберите пункт Format Fat и нажмите ОК.
11) Снова подключите Elari FixiTime 3 к компьютеру.
12) Процесс обновления ПО начнется автоматически (строка состояния в нижней части окна приложения начнет заполняться – как на картинке ниже).
ПРИМЕЧАНИЕ:
– Если часы разряжены, процедура обновления начнется с небольшой задержкой
– При низком заряде аккумулятора часов процесс обновления может прерваться. В этом случае необходимо еще раз кликнуть на значок Format, выбрать Format Fat, а затем переподключить Elari FixiTime 3 к ПК.
13) После успешного обновления ПО Elari FixiTime 3 на экране компьютера появится диалоговое окно (как на картинке ниже).
On this post, today we are going to share how to fix enumerating port error while flashing SPD based Phones. Sometimes software box/ dongle fail to flash this kind of phones. you can find these kinds of error mostly in Huawei and Lenovo Phones. Here we are going to flash Huawei Y541- U02 phones but, process are same for others phones too.
Last Updated: April 9, 2019 by Alpesh
SP Flash Tool is a flashing application which helps to take backup of your device’s firmware or flash the firmware back to your device. It is compatible with the MediaTek powered devices and works with almost all the MediaTek Devices like Smartphones, Smartwatches etc. Tough the application is simple to use but it throws many errors without proper information. So, today we are going to share the list of SP Flash Tool errors (BROM Errors) and give their meanings and solutions to fix them. We have covered almost all the SP Flash Tool errors on this page and if we have missed any, then you can post them in the comment section below.
So, let’s now proceed to fix SP Flash Tool or Fix BROM Errors on your PC.
Table of Contents
Where to Download SP Flash Tool Latest and Older Versions?
Download Latest and Older versions of SP Flash Tool from Get SP Flash Tool.
How to Fix SP Flash Tool Errors (BROM Error Codes):
SP Flash Tool Failed to enumerate COM Port
This error clearly means that the Flash Tool has issues finding the COM port on which your device is connected.
Device automatically disconnects during flashing
Meaning: Device disconnects as soon as the flashing process begins, interrupting the process.
SP Flash Tool remains at 0%
Follow the troubleshooting guide on how to fix Flash tool Stuck at 0% (waiting) issue.
Error: Initialize Scatter file failed. Please check the scatter file name you load is legal
Meaning: SP Flash Tool doesn’t accept the name of the scatter file.
Error: USB device not recognized
This error occurs while you connect your device to PC. It shows a prompt on the system tray after connecting your device.
Meaning: PC is having trouble communicating with your device (It occurs due to interruption, hardware or driver problems).
Error: Please select one ROM at least before execution
Meaning: SP Flash Tool fails to recognize that there is an item ticked.
Error: PRO_INFO: Failed to get PMT info
Meaning: SP Flash Tool is having problems reading the phone.
Note: Some phones require you to remove the battery while flashing. In this case Solution 1, you should go for.
Error 1002: S_INVALID_ARGUMENTS
Meaning: Invalid Scatter file.
Solution: Load the correct scatter file.
Error 1012: BROM ERROR: S_NOT_ENOUGH_MEMORY (1012)
Meaning: The version of SP Flash Tool doesn’t support the size(s) of the file(s) in the firmware or ROM.
Error 1003: S_COM_PORT_OPEN_FAIL (1003)
Error 1013: BROM ERROR: S_COM_PORT_OPEN Fail (1013)
Meaning: SP Flash Tool encountered an error while communicating with the device via the target port.
Error 1011: S_NOT_ENOUGH_STORAGE_SPACE
Meaning: The size of any part of the firmware is larger than the allotted space (usually a block or core)
Note: It is learned that this error sometimes occurs on the “raw” versions of the flash tool. So changing the version might help.
Error 1022:
Meaning: The version of the SP Flash tool is not compatible with your device or the USB interface is not working.
Error 1040: S_UNSUPPORTED_OPERATION (1040)
Meaning: Flash boot files & Scatter.txt doesn’t match.
Error 1042: BROM ERROR: S_TIMEOUT (1042)
Meaning: Flashing process took too long and SP Flash Tool encountered timeout.
Meaning: SP Flash Tool was unable to communicate with the device.
Error 4008: BROM ERROR : S_FT_DOWNLOAD_FAIL (4008)
Error 2004: BROM ERROR : S_FT_DOWNLOAD_FAIL (2004)
Meaning: There is an interruption between the SP Flash Tool and the device communication and the SP Flash Tool encountered an error while flashing files.
Error 2005: BROM ERROR: S_BROM_CMD_STARTCMD_FAIL (2005)
Meaning: Device attempted to power on before SP Flash Tool could flash the files to it.
Error 2020: BROM ERROR : S_BROM_CHKSUM16_MEM_RESULT_DIFF (2020)
Meaning: Flash Tool encountered a problem moving files to be flashed to the device’s internal SRAM.
Error 3001: S_DA_EXT_RAM_ERROR
Occurs due to connection problems. Check the cable and reconnect to another port. If still occurs try using different PC.
Error 3012: NAND_FLASH_NOT_FOUND
Meaning: Problem associated with the definition of a flash memory.
Error 3140: BROM ERROR: S_DA_UPDATE_BOOLOADER_EXIST_MAGIC_NOT_MATCHED
Meaning: SP flash tool encountered an error flashing a selected file to a non-specified partition
Error 3144: S_DA_EMMC_FLASH_NOT_FOUND (3144)
Meaning: Flash boot files and scatter mismatch. Note EMMC partition device and MTD partition device use different TXT boot files.
Error 3149: BROM ERROR : S_DA_SDMMC_WRITE_FAILED (3149)
Meaning: SP Flash tool is unable to flash files to the device.
Error 3168: BROM ERROR: S_CHIP_TYRE_NOT_MATCH (3168)
Meaning: SP Flash Tool detects that there is a mismatch between the information provided in the scatter file and device’s info.
Error 3182: BROM ERROR: S_STORAGE_NOT_MATCH (3182)
Error 3167: BROM_ERROR: S_STORAGE_NOT_MATCH (3167)
Error 3178: BROM_ERROR_S_STORAGE_NOT_MATCH (3178)
Meaning: Firmware you are trying to flash is not compatible with your device.
Solution: Try getting the appropriate firmware for your device model.
Error 4001: S_FT_DA_NO_RESPONSE or Da didn’t send response data to Flash Tool
Meaning: SP Flash Tool facing problem communicating with the device.
Error 4004: Driver Error
Meaning: Drivers not found or corrupted.
Solution: Uninstall drivers and reinstall them.
Error 4009: S_FT_READBACK_FAIL (4009)
Meaning: SP Flash Tool failed to create Readback file possibly due to not enough space for a file or file cannot be overwritten because it is locked.
Error 4010: BROM ERROR : S_FT_FORMAT_FAIL
Meaning: The blocks map in the scatter file doesn’t match the device’s partition sizes
Error 4017: BROM ERROR: S_FT_NAND_READLEN_NOT_ALIGNMENT (4017)
Meaning: You’re trying to flash a file that has not been processed for flashing via SP flash tool
Error 4032: BROM ERROR : S_FT_ENABLE_DRAM_FAIL (4032) [EMI] Enable DRAM fail
Meaning: The firmware you’re trying to flash is either not compatible with your device or you have selected the wrong flashing settings
Error 4050: S_FT_NEED_DOWNLOAD_ALL_FAIL
Meaning: Occurs when block sizes are not the same in the PMT and scatter. In general, this error is treated to download all the blocks (one can use data enough), then the size in the PMT should switch to the right.
Error 4058: BROM ERROR: S_FT_GET_MEMORY_FAIL (4058)
Meaning: Flash tool was unable to locate the partition you’re trying to flash.
Solution: Un-tick any item with a blank or empty location
Error 5002: S_INVALID_DA_FILE
Meaning: The Download Agent (DA) file selected is not compatible. DA file is attached to the Flash Tool release, so choose the one which is provided in the Flash Tool folder.
Error 5007: BROM ERROR : S_FTHND_FILE_IS_NOT_LOADED_YET (5007)
Meaning: You’re trying to flash a file with the unspecified path (no file selected in the item box)
Error 5054: BROM ERROR S_DL_GET_DRAM_SETTINGS_FAIL (5054)
Meaning: The files you are trying to flash are not compatible with the device.
Error 5069: BROM ERROR : S_DL_PMT_ERR_NO_SPACE (5069)
Error 5056: BROM ERROR : S_DL_PMT_ERR_NO_SPACE (5056)
Meaning: The size of a file is larger than the available partition size.
Error 5066: S_DL_PC_BL_INVALID_GFH_FILE_INFOR
Meaning: Wrong files. Scatter file of the chosen folder is not yet prepared for the FT files.
Error 5095: S_DL_MAUI_FLASH_ID_NOT_MATCHED_WITH_TARGET (5095)
Meaning: When you choose the wrong file, for example, another type of flash downloads into current flash, the tool will warn with this message. The choosen flash files are not compatible with your device.
Error 6010: BROM ERROR: SP FLASHTOOL ERROR 6010 CODE DOWNLOAD FORBIDDEN
Meaning: The device has a protected or locked bootloader.
Solution: Unlock bootloader on your device.
Error 6012: BROM ERROR: S_SECURITY_SF_CODE_COMMAND_FORBIDDEN (6012), MSP ERROR CODE: 0X00
Meaning: The Download-Agent being used is incompatible with the device.
Solution: Set Download-Agent to MTK_AllInOne_DA.bin
Error 6047: BROM ERROR: S_SECURITY_SECURE_USB_DL_IMAGE_HASH_FAIL
Meaning: Hash (integrity) check of the files being flashed failed.
Error 6124: BROM ERROR: S_SECURITY_INVALID_PROJECT (6124), MSO ERROR CODE: 0X00
Meaning: Wrong flash settings or firmware.
Error 8038: Error 8038! Android download pmt is ready and layout has been changed / PMT changed for the ROM
Meaning: SP Flash Tool is having trouble writing to certain partitions due to some incompatibility.
Error 8100:
Meaning: Cannot find USB port.
Error 8200:
Meaning: Invalid file or incompatible recovery file.
Error 8406: SP FLASH TOOL ERROR (8406)
Meaning: Compatibility issues.
Error 8417: BROM ERROR: Initialize scatter file failed. Please check the scatter file name you load is legal
Meaning: The format of Scatter file is invalid.
Open the scatter file in Notepad++, the first line must beginning with:
If there is anything else above this then delete it and save the scatter file
These were the list of SP Flash Tool Errors and solutions to fix them. Do share this with your friends on Facebook, Twitter and Google Plus etc. and help them in fixing SP Flash Tool Error they are facing.
Have we missed any SP Flash Tool BROM Error? Then do let us know in the comment section below.
Flash OEM (IBM) Mellanox ConnectX-3 EN with stock firmware?
Stereodude
Active Member
So I picked up an IBM flavored Mellanox ConnectX-3 EN (MCX312A-XCBT / Dual 10GbE SFP+) from eBay. It’s FRU: 00D9692. The latest WinOF driver installed without issue (Windows 7 Pro).
The card has a PSID of IBM1080111023 so the standard MT_1080110023 firmware won’t load on it. Here’s what I see:
Current FW version on flash: 2.30.3200
New FW version: 2.34.5000
-E- PSID mismatch. The PSID on flash (IBM1080111023) differs from the PSID in the given image (MT_1080110023).
————————————————————————
Has anyone tried this or know how it can be done?
Stereodude
Active Member
I guess I should have looked a little harder. I found this: http://www.mellanox.com/page/custom_firmware_table
However, the ConnectX-3 EN download package is for rel-2.36.5000, and the firmware page shows rel-2.34.5000 for the MT_1080110023. I’m not sure whether the IBM1080111023 is a MT_1080110023 or a MT_1080120023.
The sticker on the back of the card says Rev. A5 and was made in 2014-03-27 which would seem to suggest it might be equivalent to a MT_1080120023, but I’m not sure.
Since I don’t have my twinax cable yet or anything to plug this into, I guess I will sit tight for a while. Hopefully someone can shed some light on this.
Stereodude
Active Member
So someone on another forum pointed out the mlxup utility for Mellanox cards. That brought the card up from 2.30.3200 to 2.33.5000. Here’s what I saw (MAC addresses removed by me):
Active Member
If you got FRU 00D9692, its equivalent to the Mellanox MCX312A-XCBT
Stereodude
Active Member
Active Member
Stereodude
Active Member
Stereodude
Active Member
Active Member
Stereodude
Active Member
Okay, so the card be recovered if bricked with the vias shorted and using mlxburn?
But how do I get the IBM card to take the standard Mellanox firmware in the first place or is livefishing the card and using mlxburn how I get the standard firmware on the card?
Active Member
Active Member
Yes. mlxburn uses flint to do the actual flashing, so either works.
From what I saw in the MFT manual, the process appears to be more involved beginning with the ConnectX-4 series. That’s why I said only CX2 & CX3
Also, this disclaimer about livefish mode straight from the MFT manual:
Stereodude
Active Member
Stereodude
Active Member
Active Member
Very nice! Thanks for being the guinea pig
Active Member
Yeah, the VPD shouldn’t (it’s supposed to be read only). I notices the VPD «row» headers were rewritten: row 2 now reads Revision, but that data remains in row 6 as before.
The card does identify as Mellanox in Device Manager, right?
Lance Joseph
Member
New Member
I am trying to do this as well with a MCX314A but it looks like Mellanox has removed the custom firmware page from their site. Anyone able to share another source for that mcx314a?
**FOUND it** for anyone else looking they still have it up on their korean site
kiteboarder
Active Member
Here is what I did after I could not find the custom firmware files. This worked for a Dell branded card. Note the below instructions do not include the steps of using a shorting wire to short the holes on the card. See the info in the posts above for those details. Just remember to remove the short after you update the fw.
where «mt26448_pci_cr0» is the name output from commands 0 or 1
MikroTik Remote Firmware Update on a Small Disk Device
Published by Pessoft on March 2, 2019
This guide describes the following situation:
Some more remarks:
Not Enough Disk Space
Some MikroTik routers have a really small disk space capacity. In my case it is a MikroTik hAP lite TC – Product code RB941-2nD-TC – which has 16MB of flash storage. After some years of happy automatic updates I got to the point when automatic update did not work anymore. Reason is that firmware update file simply won’t fit into the remaining free disk space. It didn’t help to delete all the files. Even that some of the older updates downloaded, there was not enough free disk space to perform the update itself. Later, updates would not even download:
Firmware Update Alternatives
There are some alternatives to automatic process on how to update the MikroTik firmware, but none of those particularly looked promising for my environment and specifically as a replacement for the remotely executed automatic update that I’ve got used to.
One of the alternatives is Netinstall from MikroTik. Netinstall however requires the router to be on the same network where the application is running. Also it needs some extra care to run on Linux – binding of the privileged port is needed and application is primarily designed to be used on Windows systems. Some other methods suggest various ways on how to upload the update file to the router ( via Winbox, WebFig or FTP ). But with the low disk space it won’t help much.
Then I’ve noticed that it is possible to perform a manual update of selected packages only. This does not need to use one large update file, but smaller package files are used instead. This method should be available as manual update directly on the router or as update using the Dude tool. Because I do not use the Dude and I do not have it allowed to connect to the routers for security reasons, I was interested in manual update process.
Manual Update of Selected Packages
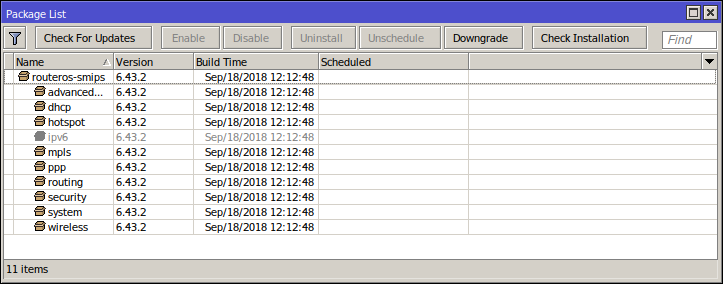
At first identify architecture of your device. You can see it in the title of WinBox when you connect to the device:
Or you can look it up in the specification pages of the device on MikroTik site. For hAP lite TC it is SMIPS.
Then download from the MikroTik download page the Extra packages ZIP file. Pay attention to the correct architecture matching your device when selecting the file from the download page.
Then extract the ZIP file, so you will have an individual package files with NPK extension. Now upload the selected packages for firmware update to the router. If only packages that need to be updated will be uploaded, then less disk space is used and even small size of the disk should be sufficient. After the reboot of the device, firmware update packages found on the device will be installed automatically.
On hAP lite TC is an ipv6 package disabled by default, so I’ve skipped that one during the update:
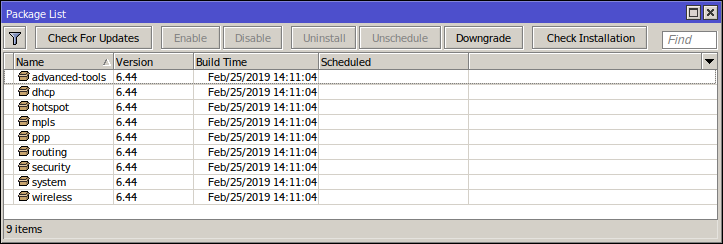
I have noticed that if package file was not there during the update, it has been uninstalled. So make sure that you upload:
After the update, packages will have a new version displayed. Also structure of the packages will change from tree to flat. Packages will be no longer under routeros-smips:
Result
Manual firmware update process of selected packages updated the MikroTik router remotely. Process did not require to fit one complete update file on the router. Instead, firmware update used smaller package files.
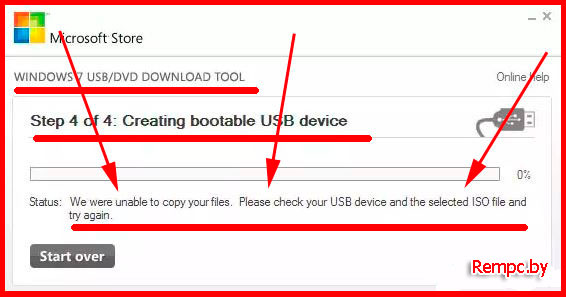
Ошибка: we were unable to copy your files. please check your usb device and the selected iso
Быстро разбираемся с ошибкой: we were unable to copy your files. please check your usb device and the selected iso
Здравствуйте друзья. В этой заметке рассмотрим с вами, что предпринять в ситуации, когда вы пытаетесь создать загрузочную флешку через программу:
и в последнем диалоговом окне этой программы получаете сообщение we were unable to copy your files. please check your usb device and the selected iso. Эта программа действительно очень хороша и удобна, поэтому давайте решим этот вопрос, чтобы и впредь ею можно было пользоваться.
Итак, приступим
Всё что нам нужно это подготовить флешку немного необычным способом, перед тем как делать её загрузочной. Делается это несложно и будет пошагово показано в картинках ниже. Все действия будем производить в командной строке операционной системы (ОС).
Это очень полезная служба для тонкой настройки или проверки ОС. Она функционирует с помощью специальных команд, которые нужно записывать вручную.
Чтобы открыть командную строку нам нужно выполнить такие действия:
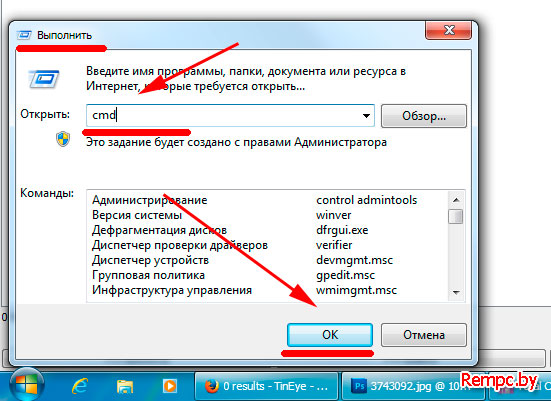
Нажимаем вместе две клавиши win+r:
появится служба запуска программ, в которой мы и запустим нашу командную строку. В этом окне пишем «cmd» и нажимаем «OK»:
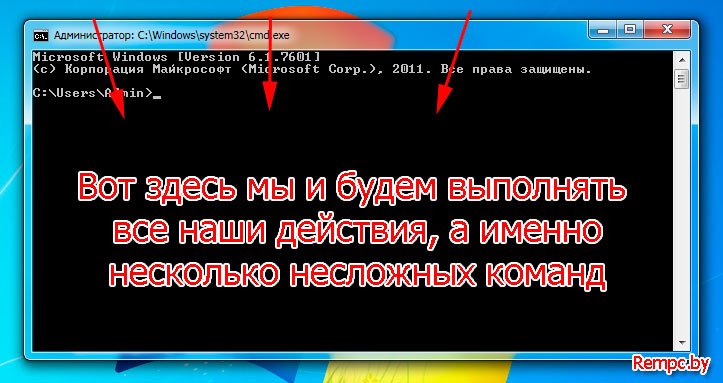
всё должно появиться окно с чёрным фоном, в котором мы и будем работать:
Теперь мы будем записывать там такую не большую последовательность команд, нужная флешка должна стоять в компьютере.
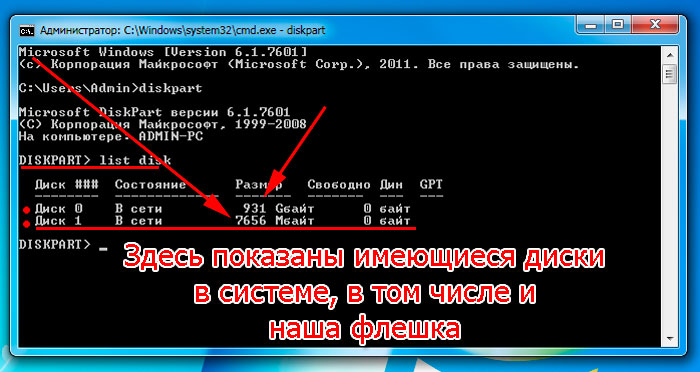
Сначала пишем команду diskpart и нажимаем ввод:
Далее list disk и опять ввод, важно помнить, что каждую команду мы подтверждаем клавишей «Ввод» или по-другому «Enter»
Мы должны записать команду select disk и добавить номер нашей флешки, в нашем случае это 1, то есть запись должна быть такая select disk 1:
Здесь стоит немного поднапрячься и осознанно сделать правильный выбор, поскольку, если выберете свой жёсткий диск, то можете его форматировать и потерять данные, да и вообще ОС может выйти из строя и не запуститься при следующем запуске.
В общем, не всё так страшно, просто важно понимать, что, если размер вашей флешки 16 гигабайт, то просто выбираем строку с таким размером, здесь, в общем-то, сложно ошибиться.
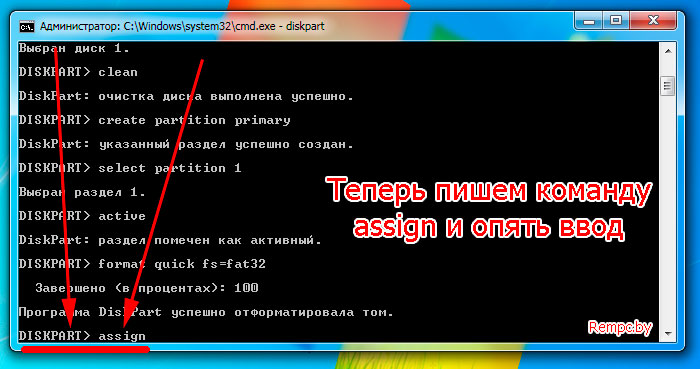
А сейчас нужно прописать несколько команд по порядку и всё, после каждой из них нажимаем ввод, а потом записываем другую:
На этом всё. Теперь можно создавать загрузочную флешку с помощью программы Windows 7 USB/DVD Download Tool, проблем возникнуть не должно.
S brom chksum16 mem result diff 2020
Официальная версия
В процессе прошивки устройств Android при помощи программы SP Flash Tool периодически возникают ошибки, на решение которых собственными силами часто уходит достаточно большое количество времени.
Для вашего информирования и удобства, выполнена подборка самых распространенных кодов ошибок с подробным описанием и вариантами их решения и устранения.
Last Updated: April 9, 2019 by Alpesh
SP Flash Tool is a flashing application which helps to take backup of your device’s firmware or flash the firmware back to your device. It is compatible with the MediaTek powered devices and works with almost all the MediaTek Devices like Smartphones, Smartwatches etc. Tough the application is simple to use but it throws many errors without proper information. So, today we are going to share the list of SP Flash Tool errors (BROM Errors) and give their meanings and solutions to fix them. We have covered almost all the SP Flash Tool errors on this page and if we have missed any, then you can post them in the comment section below.
So, let’s now proceed to fix SP Flash Tool or Fix BROM Errors on your PC.
Table of Contents
Where to Download SP Flash Tool Latest and Older Versions?
Download Latest and Older versions of SP Flash Tool from Get SP Flash Tool.
How to Fix SP Flash Tool Errors (BROM Error Codes):
SP Flash Tool Failed to enumerate COM Port
This error clearly means that the Flash Tool has issues finding the COM port on which your device is connected.
Device automatically disconnects during flashing
Meaning: Device disconnects as soon as the flashing process begins, interrupting the process.
SP Flash Tool remains at 0%
Follow the troubleshooting guide on how to fix Flash tool Stuck at 0% (waiting) issue.
Error: Initialize Scatter file failed. Please check the scatter file name you load is legal
Meaning: SP Flash Tool doesn’t accept the name of the scatter file.
Error: USB device not recognized
This error occurs while you connect your device to PC. It shows a prompt on the system tray after connecting your device.
Meaning: PC is having trouble communicating with your device (It occurs due to interruption, hardware or driver problems).
Error: Please select one ROM at least before execution
Meaning: SP Flash Tool fails to recognize that there is an item ticked.
Error: PRO_INFO: Failed to get PMT info
Meaning: SP Flash Tool is having problems reading the phone.
Note: Some phones require you to remove the battery while flashing. In this case Solution 1, you should go for.
Error 1002: S_INVALID_ARGUMENTS
Meaning: Invalid Scatter file.
Solution: Load the correct scatter file.
Error 1012: BROM ERROR: S_NOT_ENOUGH_MEMORY (1012)
Meaning: The version of SP Flash Tool doesn’t support the size(s) of the file(s) in the firmware or ROM.
Error 1003: S_COM_PORT_OPEN_FAIL (1003)
Error 1013: BROM ERROR: S_COM_PORT_OPEN Fail (1013)
Meaning: SP Flash Tool encountered an error while communicating with the device via the target port.
Error 1011: S_NOT_ENOUGH_STORAGE_SPACE
Meaning: The size of any part of the firmware is larger than the allotted space (usually a block or core)
Note: It is learned that this error sometimes occurs on the “raw” versions of the flash tool. So changing the version might help.
Error 1022:
Meaning: The version of the SP Flash tool is not compatible with your device or the USB interface is not working.
Error 1040: S_UNSUPPORTED_OPERATION (1040)
Meaning: Flash boot files & Scatter.txt doesn’t match.
Error 1042: BROM ERROR: S_TIMEOUT (1042)
Meaning: Flashing process took too long and SP Flash Tool encountered timeout.
Meaning: SP Flash Tool was unable to communicate with the device.
Error 4008: BROM ERROR : S_FT_DOWNLOAD_FAIL (4008)
Error 2004: BROM ERROR : S_FT_DOWNLOAD_FAIL (2004)
Meaning: There is an interruption between the SP Flash Tool and the device communication and the SP Flash Tool encountered an error while flashing files.
Error 2005: BROM ERROR: S_BROM_CMD_STARTCMD_FAIL (2005)
Meaning: Device attempted to power on before SP Flash Tool could flash the files to it.
Error 2020: BROM ERROR : S_BROM_CHKSUM16_MEM_RESULT_DIFF (2020)
Meaning: Flash Tool encountered a problem moving files to be flashed to the device’s internal SRAM.
Error 3001: S_DA_EXT_RAM_ERROR
Occurs due to connection problems. Check the cable and reconnect to another port. If still occurs try using different PC.
Error 3012: NAND_FLASH_NOT_FOUND
Meaning: Problem associated with the definition of a flash memory.
Error 3140: BROM ERROR: S_DA_UPDATE_BOOLOADER_EXIST_MAGIC_NOT_MATCHED
Meaning: SP flash tool encountered an error flashing a selected file to a non-specified partition
Error 3144: S_DA_EMMC_FLASH_NOT_FOUND (3144)
Meaning: Flash boot files and scatter mismatch. Note EMMC partition device and MTD partition device use different TXT boot files.
Error 3149: BROM ERROR : S_DA_SDMMC_WRITE_FAILED (3149)
Meaning: SP Flash tool is unable to flash files to the device.
Error 3168: BROM ERROR: S_CHIP_TYRE_NOT_MATCH (3168)
Meaning: SP Flash Tool detects that there is a mismatch between the information provided in the scatter file and device’s info.
Error 3182: BROM ERROR: S_STORAGE_NOT_MATCH (3182)
Error 3167: BROM_ERROR: S_STORAGE_NOT_MATCH (3167)
Error 3178: BROM_ERROR_S_STORAGE_NOT_MATCH (3178)
Meaning: Firmware you are trying to flash is not compatible with your device.
Solution: Try getting the appropriate firmware for your device model.
Error 4001: S_FT_DA_NO_RESPONSE or Da didn’t send response data to Flash Tool
Meaning: SP Flash Tool facing problem communicating with the device.
Error 4004: Driver Error
Meaning: Drivers not found or corrupted.
Solution: Uninstall drivers and reinstall them.
Error 4009: S_FT_READBACK_FAIL (4009)
Meaning: SP Flash Tool failed to create Readback file possibly due to not enough space for a file or file cannot be overwritten because it is locked.
Error 4010: BROM ERROR : S_FT_FORMAT_FAIL
Meaning: The blocks map in the scatter file doesn’t match the device’s partition sizes
Error 4017: BROM ERROR: S_FT_NAND_READLEN_NOT_ALIGNMENT (4017)
Meaning: You’re trying to flash a file that has not been processed for flashing via SP flash tool
Error 4032: BROM ERROR : S_FT_ENABLE_DRAM_FAIL (4032) [EMI] Enable DRAM fail
Meaning: The firmware you’re trying to flash is either not compatible with your device or you have selected the wrong flashing settings
Error 4050: S_FT_NEED_DOWNLOAD_ALL_FAIL
Meaning: Occurs when block sizes are not the same in the PMT and scatter. In general, this error is treated to download all the blocks (one can use data enough), then the size in the PMT should switch to the right.
Error 4058: BROM ERROR: S_FT_GET_MEMORY_FAIL (4058)
Meaning: Flash tool was unable to locate the partition you’re trying to flash.
Solution: Un-tick any item with a blank or empty location
Error 5002: S_INVALID_DA_FILE
Meaning: The Download Agent (DA) file selected is not compatible. DA file is attached to the Flash Tool release, so choose the one which is provided in the Flash Tool folder.
Error 5007: BROM ERROR : S_FTHND_FILE_IS_NOT_LOADED_YET (5007)
Meaning: You’re trying to flash a file with the unspecified path (no file selected in the item box)
Error 5054: BROM ERROR S_DL_GET_DRAM_SETTINGS_FAIL (5054)
Meaning: The files you are trying to flash are not compatible with the device.
Error 5069: BROM ERROR : S_DL_PMT_ERR_NO_SPACE (5069)
Error 5056: BROM ERROR : S_DL_PMT_ERR_NO_SPACE (5056)
Meaning: The size of a file is larger than the available partition size.
Error 5066: S_DL_PC_BL_INVALID_GFH_FILE_INFOR
Meaning: Wrong files. Scatter file of the chosen folder is not yet prepared for the FT files.
Error 5095: S_DL_MAUI_FLASH_ID_NOT_MATCHED_WITH_TARGET (5095)
Meaning: When you choose the wrong file, for example, another type of flash downloads into current flash, the tool will warn with this message. The choosen flash files are not compatible with your device.
Error 6010: BROM ERROR: SP FLASHTOOL ERROR 6010 CODE DOWNLOAD FORBIDDEN
Meaning: The device has a protected or locked bootloader.
Solution: Unlock bootloader on your device.
Error 6012: BROM ERROR: S_SECURITY_SF_CODE_COMMAND_FORBIDDEN (6012), MSP ERROR CODE: 0X00
Meaning: The Download-Agent being used is incompatible with the device.
Solution: Set Download-Agent to MTK_AllInOne_DA.bin
Error 6047: BROM ERROR: S_SECURITY_SECURE_USB_DL_IMAGE_HASH_FAIL
Meaning: Hash (integrity) check of the files being flashed failed.
Error 6124: BROM ERROR: S_SECURITY_INVALID_PROJECT (6124), MSO ERROR CODE: 0X00
Meaning: Wrong flash settings or firmware.
Error 8038: Error 8038! Android download pmt is ready and layout has been changed / PMT changed for the ROM
Meaning: SP Flash Tool is having trouble writing to certain partitions due to some incompatibility.
Error 8100:
Meaning: Cannot find USB port.
Error 8200:
Meaning: Invalid file or incompatible recovery file.
Error 8406: SP FLASH TOOL ERROR (8406)
Meaning: Compatibility issues.
Error 8417: BROM ERROR: Initialize scatter file failed. Please check the scatter file name you load is legal
Meaning: The format of Scatter file is invalid.
Open the scatter file in Notepad++, the first line must beginning with:
If there is anything else above this then delete it and save the scatter file
These were the list of SP Flash Tool Errors and solutions to fix them. Do share this with your friends on Facebook, Twitter and Google Plus etc. and help them in fixing SP Flash Tool Error they are facing.
Have we missed any SP Flash Tool BROM Error? Then do let us know in the comment section below.
Вердикт от 5[Strogino] :
На текущий момент вердикт, что это аппаратная проблема.
Скорее всего это особенность флешпамяти — бывают такие случаи, когда ни форматирование, ни низкоуровневое форматирование не дает никакого эффекта — на флешке остаются файлы как есть.
Источники информации:
- http://forums.servethehome.com/index.php?threads/flash-oem-ibm-mellanox-connectx-3-en-with-stock-firmware.8689/
- http://blog.pessoft.com/2019/03/02/mikrotik-firmware-remote-upgrade-small-disk-device/
- http://rempc.by/chastye-neispravnosti/oshibka-we-were-unable-to-copy-your-files-please-check-your-usb-device-and-the-selected-iso.html
- http://planshet-info.ru/kompjutery/s-brom-chksum16-mem-result-diff-2020


