The virtual machine is using a hardware version that is not supported
The virtual machine is using a hardware version that is not supported
The virtual machine is using a hardware version that is not supported
Добрый день! Многие компании сейчас все чаще переносят свои ресурсы и сервисы к облачным провайдерам, таким как AWS, Azure или vCLoud Director. Сама миграция может происходить как создание в облаке нового сервера и ручной перенос сервисов, либо же миграция виртуальной машины, после P2V конвертирования. В момент переноса виртуальной машины в облако VMware vCLoud Director, я получал ошибку » The OVF package requires hardware version 13 but the selected VDC only supports hardware version 11«. Из ошибки следовало, что моя версию виртуальной машины, более новая, чем поддерживает провайдер. Тут вариантов было несколько, увеличить версию поддержки, либо же понизить версию виртуального аппаратного обеспечения (Virtual Hardware Version / VM version). В данной заметке, я вам покажу, как можно быстро изменить версию VM version, на нужную вам.
Что такое уровень виртуального аппаратного обеспечения
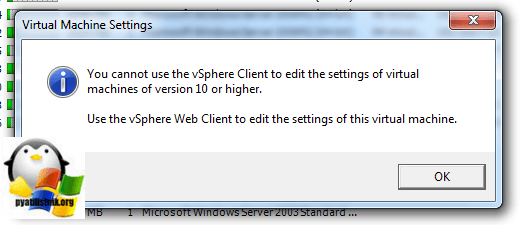
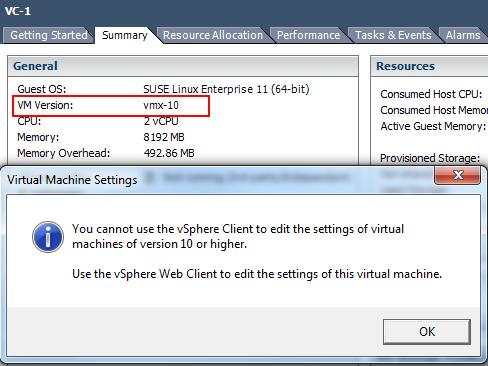
Еще в старых версиях VMware ESXI 5.5 вы могли сталкиваться с ситуацией, когда вы не могли управлять из толстого клиента vCenter, виртуальными машинами, у которых версия виртуального аппаратного обеспечения была 10-й и вы видели сообщение:
Администраторам уже тогда, в некоторых случаях, требовался откат версии виртуального оборудования, до 9-й или 8-й. Хотя компанию Vmware понять можно, она семимильными шагами загоняла всех в vSphere Web Client.
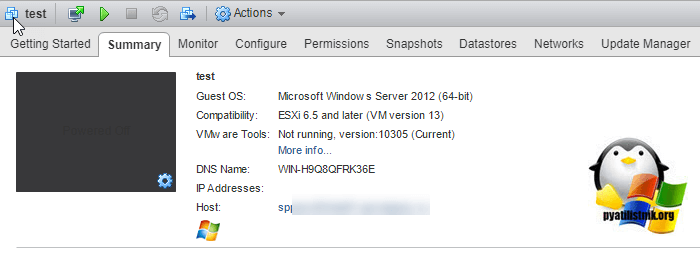
Как посмотреть версию виртуального оборудования, я вам уже показывал, можете ознакомиться. В моем примере есть тестовая виртуальная машина с Windows Server 2012 R2, как видите, у нее версия виртуальной машины (VM version) 13-я.
Методы понижения (downgrade) версии виртуального оборудования
Существует несколько методов, которые вам помогут уменьшить версию «VM version» у нужной вам виртуальной машины, среди них есть как официальные. так и не очень:
Downgrade через редактирование virtualHW.version
Так как мне дорого мое время, то я использую для понижения версии виртуального оборудования на ESXI хостах, метод с редактированием параметра virtualHW.version в конфигурационном файле виртуальной машины. Вы скачиваете либо, через vSphere Web Client, либо через ssh конфигурационный файл формата *.vmx.
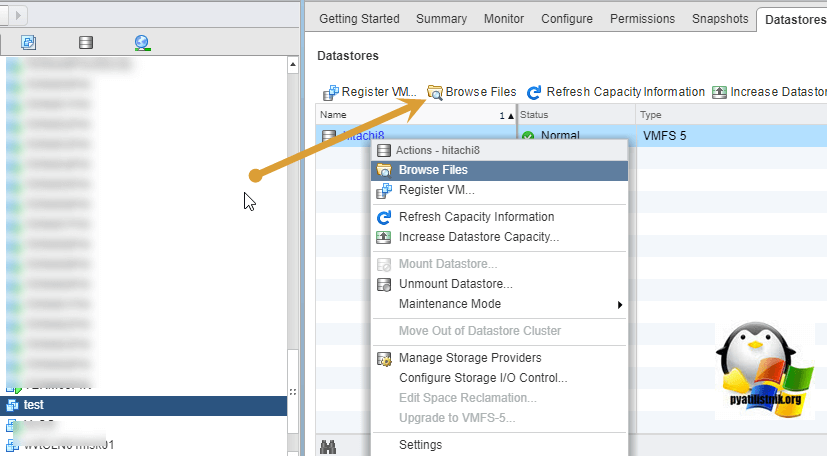
В веб-интерфейсе откройте вкладку «Datastores», и выберите там пункт «Browse Files», для просмотра содержимого на данном хранилище.
Далее, когда вы получили конфиг-файл, вы редактируете его любым текстовым редактором. В файле находите параметр virtualHW.version = «13», в моем случае VM version имеет 13 версию, я поменяю ее на 11. Копируете фал обратно с заменой оригинального и проверяете результат, у вас при включении виртуальной машины должна понизиться версия виртуального оборудования.
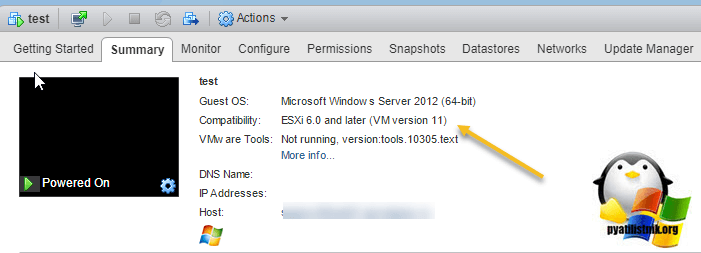
В итоге когда я включил свой сервер, то лицезрел цифру 11.
Изменение версии оборудования, через VMware vCenter Converter Standalone
Этот метод, гораздо более время затратный, и потребует установки конвертера VMware vCenter Converter.
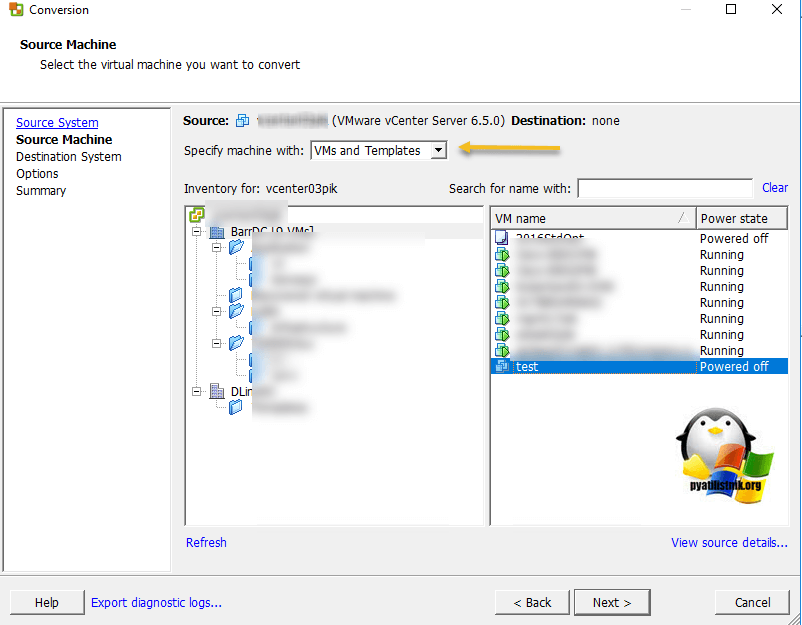
Открываете его и нажимаете кнопку «Convert machine».
Производите подключение к вашему vCenter серверу или Vmware ESXI хосту, убедитесь, что у вас стоит пункт «Power Off», означающий, что виртуальная машина отключена.
В пункте «Specify machine with» поставьте значение «VMs and Templates», в структуре датацентров, найдите вашу виртуальную машину.
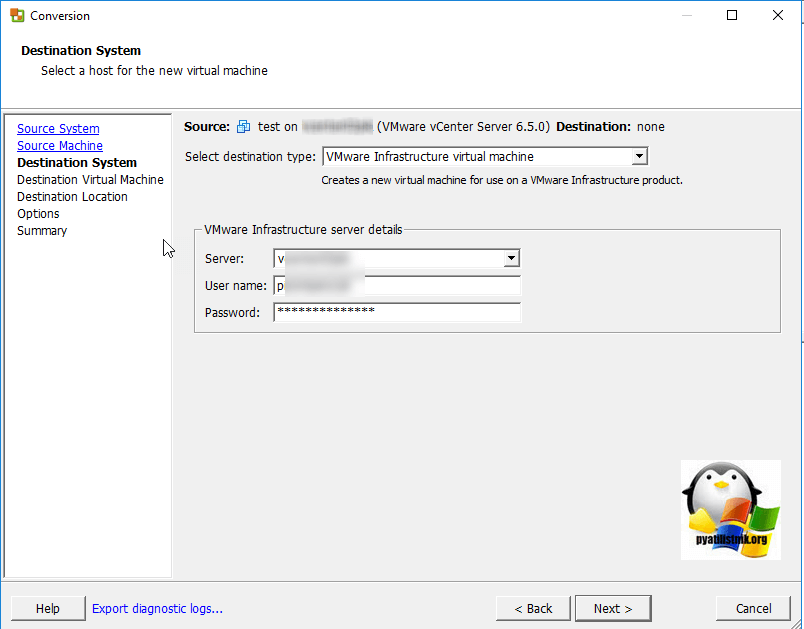
Далее вам нужно подключиться к Vcenter серверу или ESXI хосту, куда будет конвертироваться виртуальная машина, у которой будет понижена версия VM version.
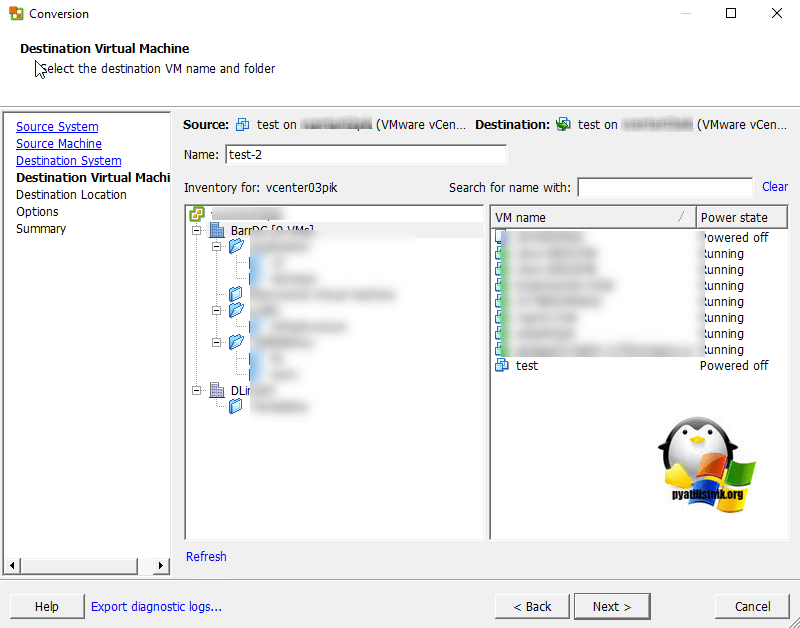
Задаете новое имя виртуальной машине и нажимаете «Next».
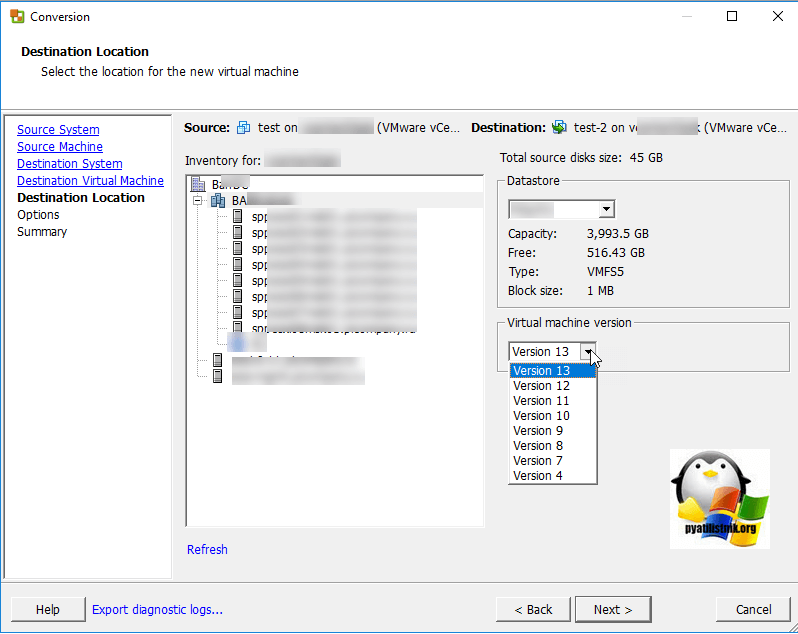
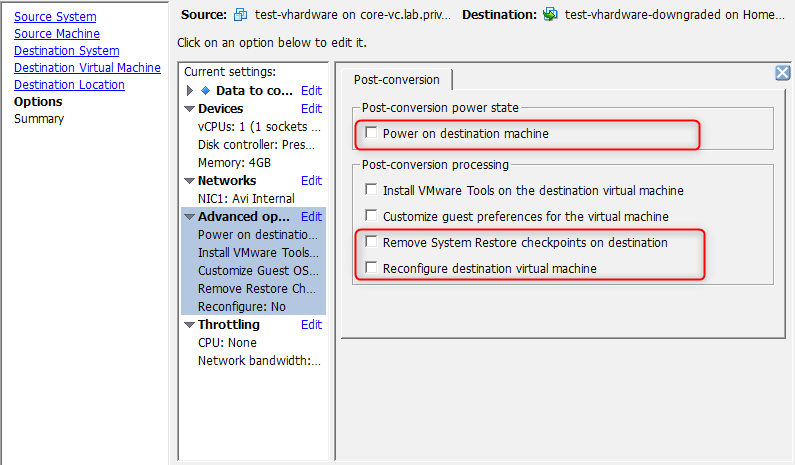
На следующем шаге выберите на каком ESXI хосте у вас будет располагаться ваша виртуалка и задайте ей нужную версию «Virtual machine version». После того, как задание будет выполнено, вы получите downgrade виртуального аппаратного обеспечения.
Пересоздание виртуальной машины
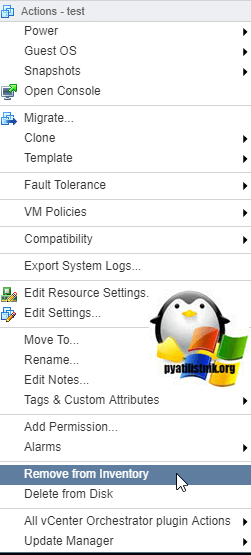
Тоже так себе метод, так как вам придется восстановить конфигурацию в первозданном виде, хорошо если у вас нет привязок по mac адресам или другим аппаратным GUID, а если есть, то придется выполнить дополнительные действия. Щелкаем по нужному серверу и выбираем из контекстного меню пункт «Remove from inventory». В итоге у вас ваша машинка не удалится с дисков, а просто исчезнет из списка зарегистрированных на vCenter сервере.
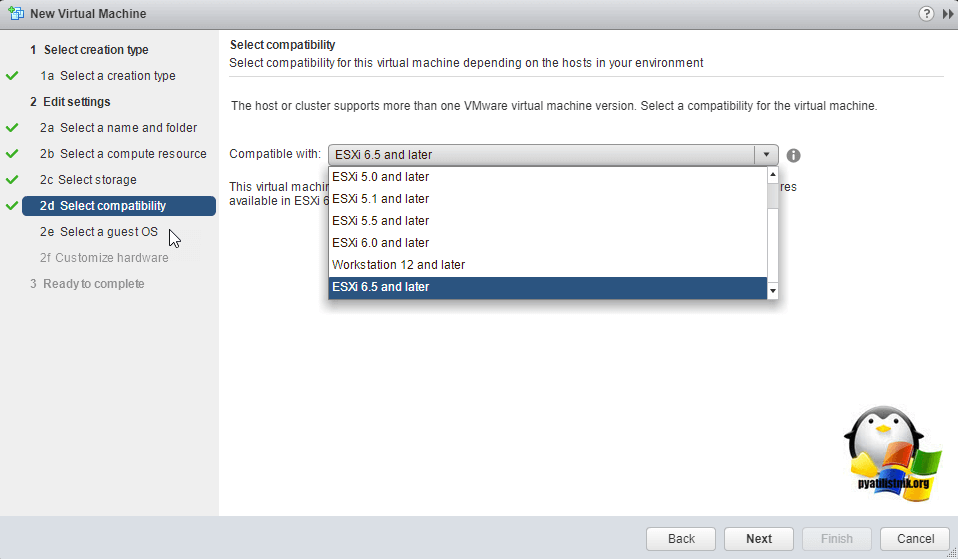
Далее вы создаете новую виртуальную машину, задаете ей другое имя отличное от старой. На шаге 2d Select compatibility вы выбираете версию виртуалки. Таблицу версий можно посмотреть вот тут.
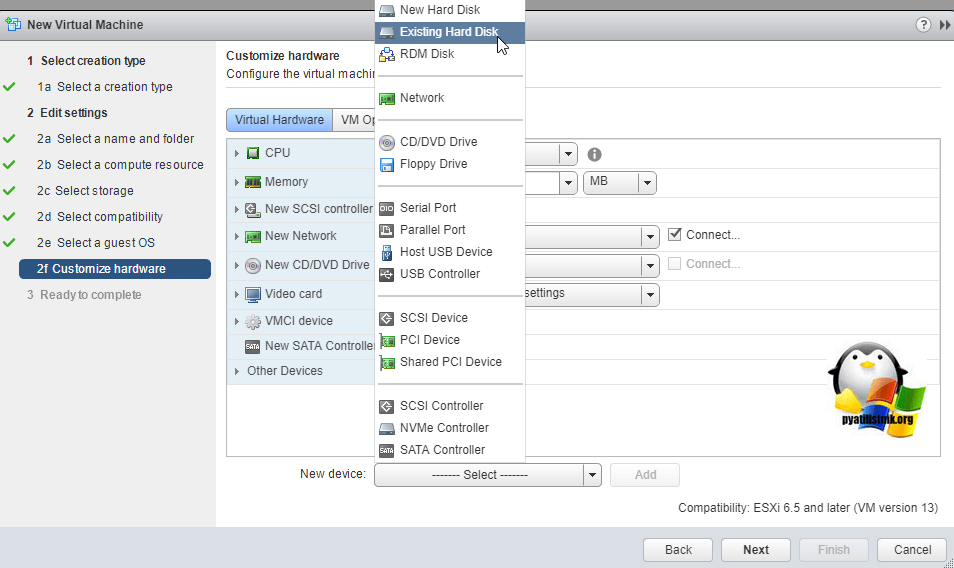
На шаге 2f удалите все виртуальные диски и выберите пункт существующие диски «Exsisting Hard Disk».
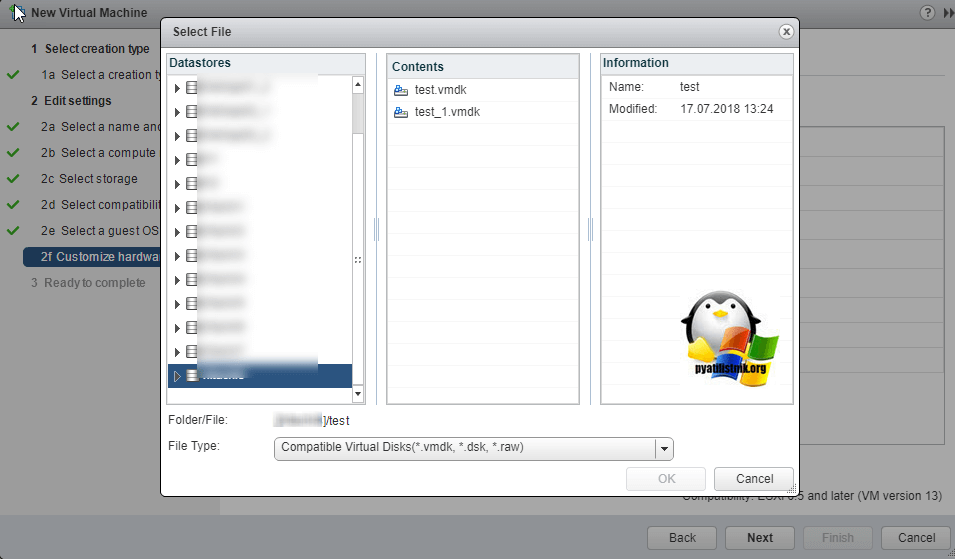
Найдите ваши виртуальные диски на вашем датасторе и добавьте их.
Как видите данный метод, не менее трудоемкий, чем второй. Вы сами вправе выбирать любой из методов, подходящих именно вам. Если вы знаете другие, то напишите их в комментариях, буду вам признателен. Остались вопросы, так же готов их с вами обсудить, а пока вы пишите, я перевожу сервисы и ресурсы в VMware vCLoud Director.
Как понизить версию VM Hardware (виртуального железа)
В прошлой статье мы говорили о возможностях отката/возврата к предыдущей версии ESXi (https://vmblog.ru/kak-otkatit-esxi-6-5-i-vernutsya-k-predydushhemu-bildu/)на хосте виртуализации. Подобный откат в некоторых случаях может вызвать проблемы совместимости, одной из таких проблем является совместимость версии ESXi и используемой версии VM Hardware (виртуального аппаратного обеспечения ВМ). При попытке запуска виртуальной машина с более высокой версией VM Hardware на старой версии ESXi (которая не поддерживает новый формат оборудования), вы получите сообщение об ошибке и не сможете запустить ВМ.
This virtual machine uses hardware version x, which is no longer supported. Upgrade is recommended.
Для решения таких проблем VMware предлагает три способа понижения версии аппаратного обеспечения виртуальной машины:
В этом примере мы покажем процесс понижения версии VM Hardware с версии 13 до 11.
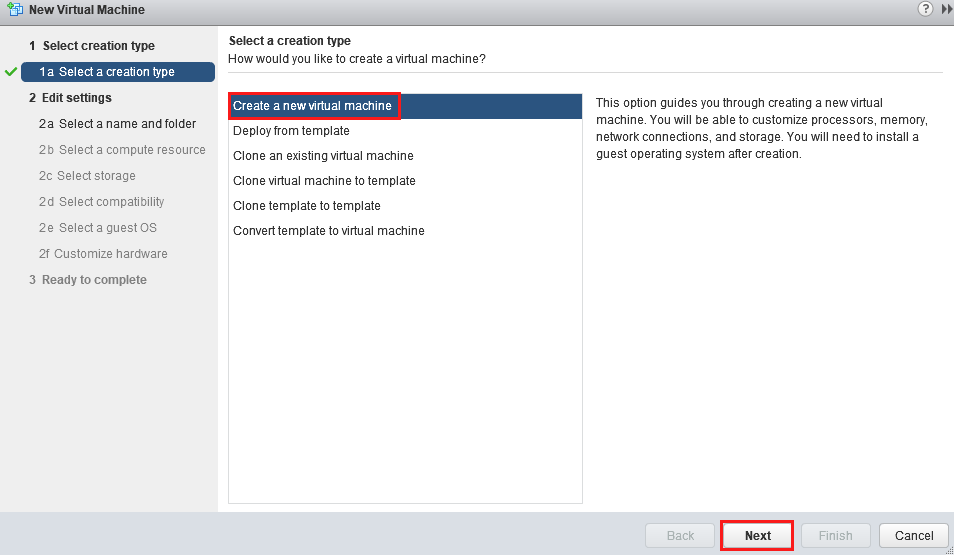
Для начала, создадим новую виртуальную машину с помощью веб интерфейса vCenter (New Virtual Machine ).
Укажите, что вам нужна новая ВМ (Create a new virtual machine).
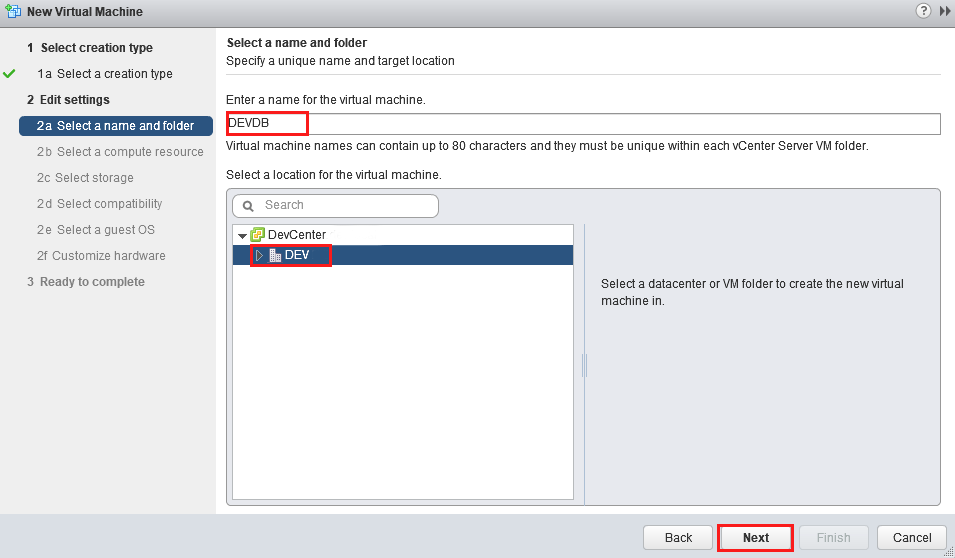
Введите новое уникальное имя виртуальной машины и укажите датацентр, кластер и хост, на котором она будет расположена. Имя должно отличаться от имени старой ВМ, в дальнейшем его можно будет изменить (Переименование виртуальных машин в VMware ESXi).
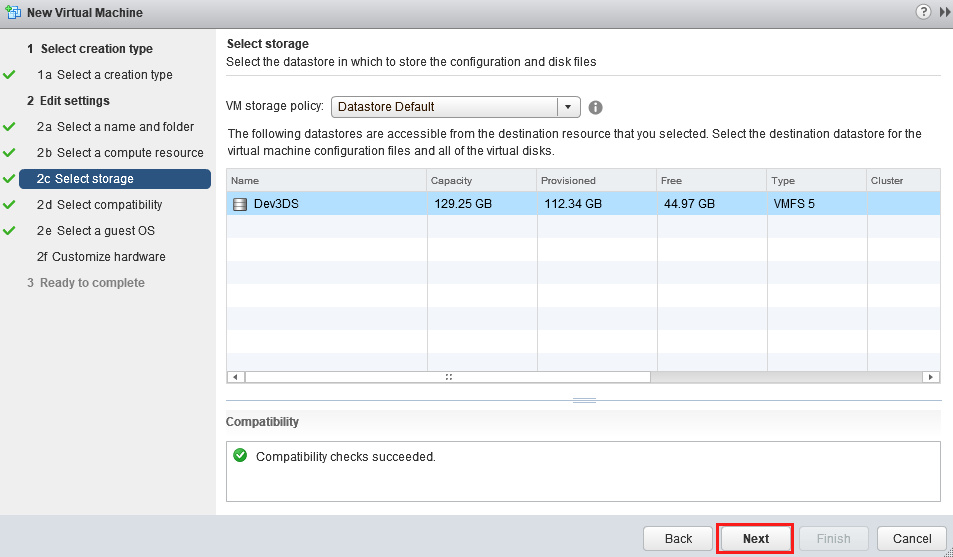
Укажите хранилище, на котором будут расположен конфигурационный файл ВМ и ее диски.
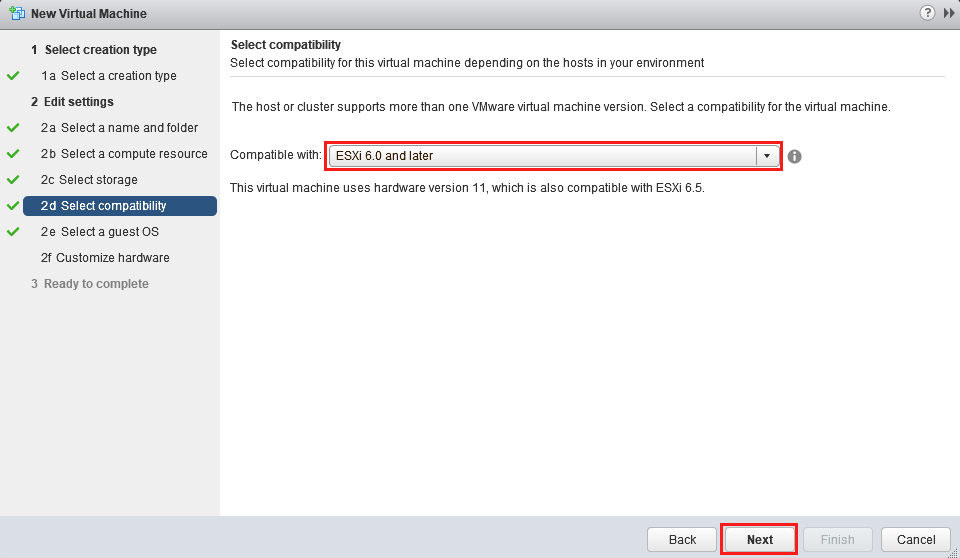
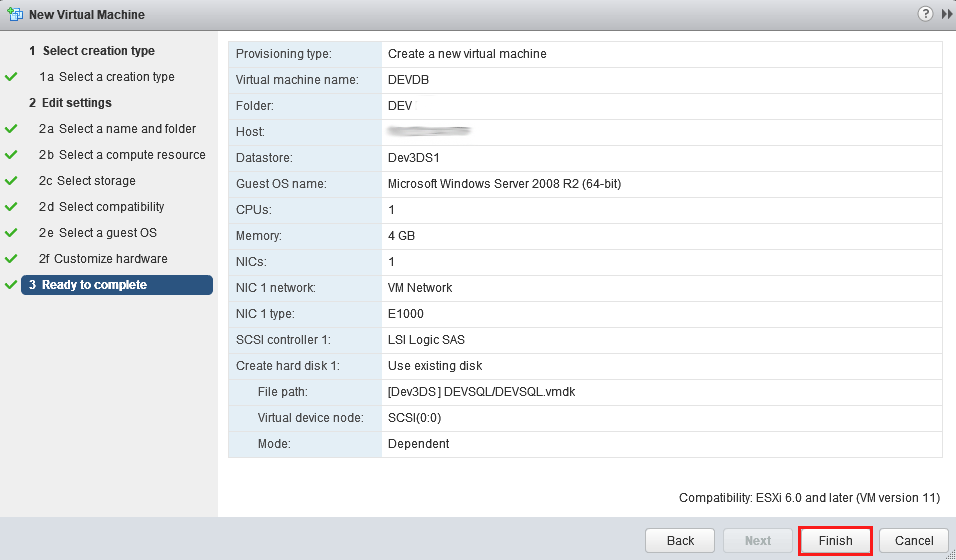
На следующем шаге нужно будет указать уровень совместимости ВМ. В нашем случае нужно выбрать ESXi 6.0 and later, что означает использование 11 версии виртуального «железа».
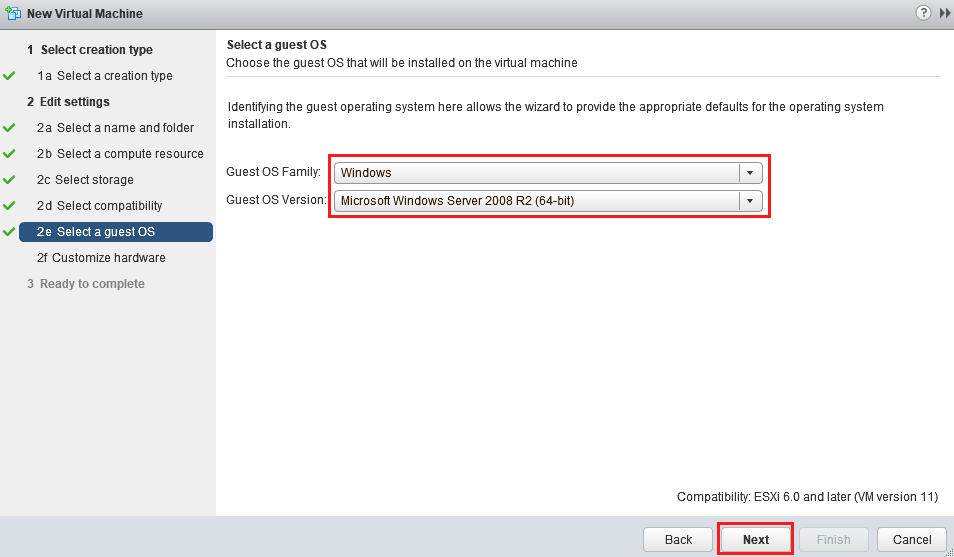
Выберите семейство и версию гостевой ОС.
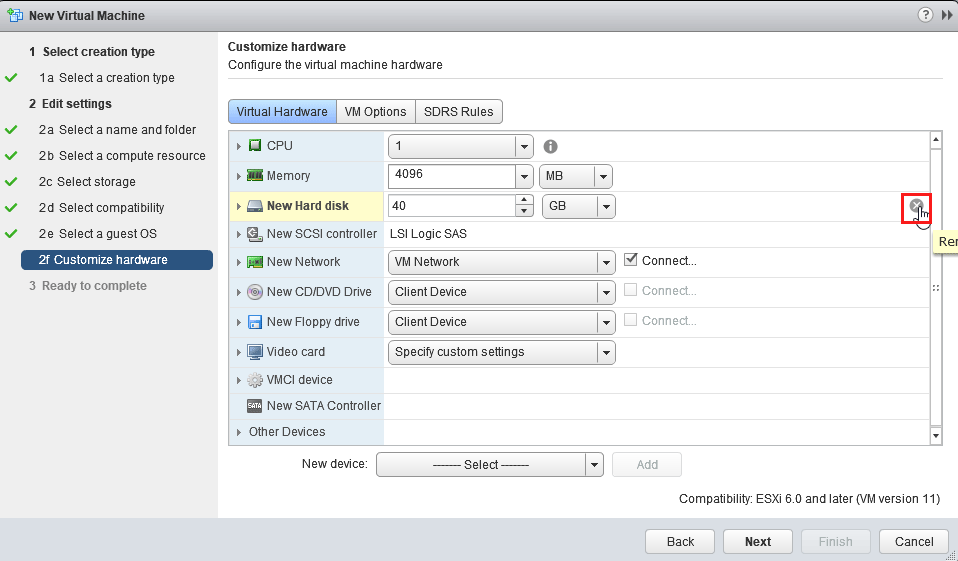
Теперь нужно переподключить диск старой виртуальной машины к новой. Сначала нужно удалить автоматически созданный диск ВМ (New Hard disk), т.к. он нам не будет нужен.
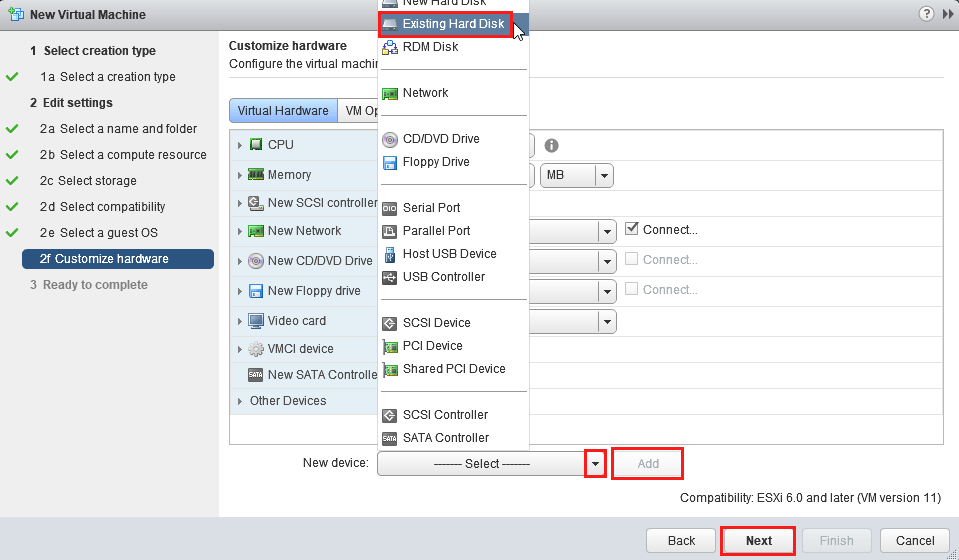
В выпадающем списке New Device выберите Existing Hard Disk и нажмите Add.
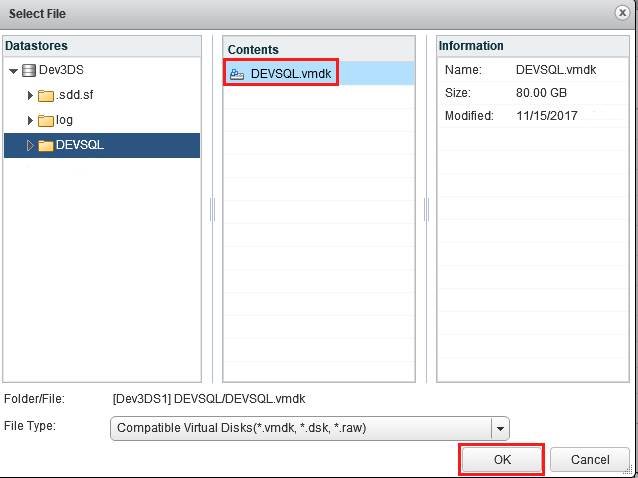
Вам будет предложено указать существующий vmdk файл. Найдите его на VMFS хранилище и нажмите OK. Если у старой ВМ было несколько дисков, нужно будет последовательно добавить их все.
На этом все, в окне создания ВМ можно нажать Finish.
Будет создана новая машина с существующими дисками. Попробуйте включить ВМ и убедиться, что ОС загрузилась корректно, а версия vm hardware понизилсь.
Reserved Space for Virtualization
Downgrade VMware Virtual Machine Hardware Version
This post is going to quickly explain you with the different procedures to downgrade your Virtual Machine Hardware Version from vmx-10 (VM Hardware Version 10) to vmx-9 (VM hardware version 9). You may ask me the question why do you want me to downgrade the Virtual Machine Hardware Version. Downgrading Virtual Machine Hardware version may required if you have come across one of the below situation:
1. You are migrating your Virtual Machine with Vmx-10 (VM Hardware version 10) from ESXi 5.5 host to ESXi 5.1 host or previous versions. You will not be able to manage the VM with higher Hw version in previous versions of Host.
2. Virtual Machine with Legacy operating system does not support the latest hardware devices supported by HW version 10. So you may downgrade the Virtual Machine hardware version to compatible with your legacy guest OS.
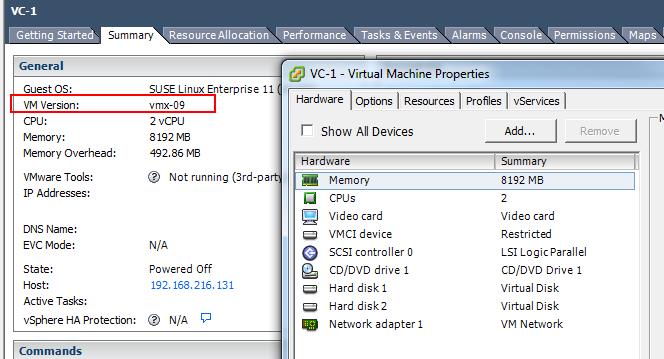
3. Another 3rd reason which you may not face frequently but i faced the issue. Let’s say your vSphere web client is crashed, You will not be able to edit the settings of Virtual Machine Hardware version 10 with vSphere client. In that situation, you may need to downgrade the Virtual Machine hardware version from 10 to 9 to get that managed by vSphere windows client However,You will be able to manage to perform almost most of tasks using PowerCLI scripting if you are familiar with powerCLi scripting.. You may receive the below warning if you try to edit Virtual Machine properties, if Hardware version is 10 or more.
” You cannot use the vSphere Client to edit the settings of virtual machines of version 10 or higher. Use the vSphere Web client to edit the settings of this virtual machine”
Methods to achieve Downgrade of Virtual Machine Hardware Version
1. Use VMware Converter and perform V2V migration to downgrade the Virtual Machine Hardware version
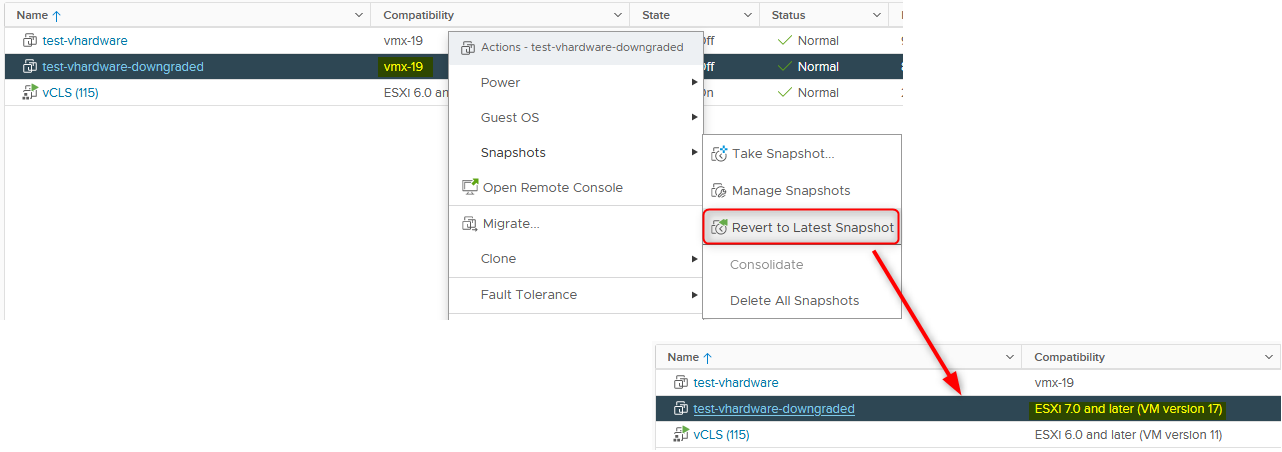
2. Revert to previous snapshot, if you have taken snapshot before the VM hardware version upgrade
3. Create a New Virtual Machine with older hardware version and attach the disks from the existing Virtual Machine
1. Login to the ESXi hosts where that particular Virtual Machine running using SSH and browse towards the virtual machine location. Power off the Virtual Machine before editing the Configuration file of virtual machine
2. You can verify the current Virtual Machine hardware version from Virtual Machine configuration file (.vmx)
cat VC-1.vmx | grep virtualHW.version
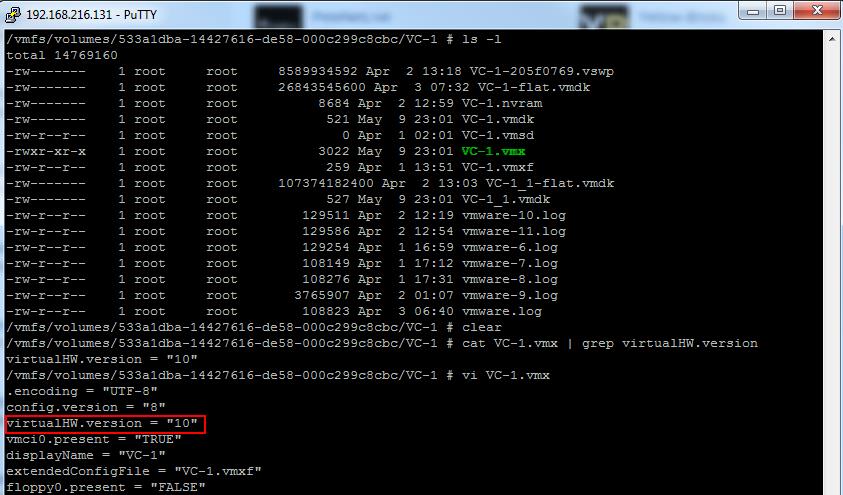
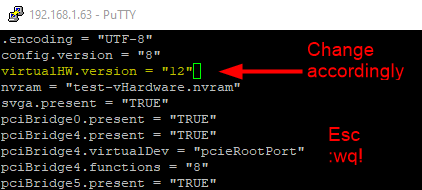
3. Edit the Virtual machine configuration file (Vmname.vmx) file using VI editor
Vi VC-1.vmx
Press ESC and type :wq!
6. Remove the Virtual Machine from vCenter inventory and register again. That’s it. Your Virtual Machine Hardware version will reflect as vmx-9 and you will be bale to edit the Virtual Machine Properties using vSphere Client.
That’s it I hope this is informative for you. Thanks for Reading. Be Social and Share it in social media, if you feel worth sharing it.
4 ways to downgrade the VM hardware version
Save to My DOJO
Table of contents
Like most major versions, vSphere 7 brought new virtual hardware levels with many new features and improvements. Everyone will agree that keeping your environment up to date is paramount to ensuring support and stability. However, in some instances, VM compatibility is sometimes the cause of issues according to the upgrade process.
While upgrading is straightforward, downgrading can only be done in a few different ways and may be needed to ensure retro-compatibility. We will describe, in this article, how you can do it in vSphere 7.
What is VM compatibility?
First off, a quick reminder on what VM compatibility (a.k.a. virtual hardware) represents. Be it in vSphere 7 or any other version. From a purely functional standpoint, VM compatibility will dictate which vSphere version a VM can run on.
“ Virtual Machines Compatibility features set.”
At the end of the day, VM compatibility and virtual Hardware refer to the same thing. Except compatibility is expressed in vSphere versions and virtual Hardware has a specific version number. Note that these also apply to VMware Workstation, Fusion…
Compatibility and virtual hardware versions are usually revised with each major version of vSphere. Although it’s been more often since the release of vSphere 7 and the move to a shorter 6-months release cycle. As you can see in vSphere 7 Update 2, we are currently on virtual hardware version 19.
“ Virtual Machine Compatibility Options table.”
You get to choose the compatibility level when you create a VM. In case you run a heterogeneous cluster (in terms of vSphere version), you should always pick the compatibility for the lowest vSphere version.
Also, note that you can configure a default compatibility version for your newly created virtual machines. That way you can still select the latest virtual hardware but the one selected by default in the list will be the one you chose. This helps prevent mistakes in heterogeneous environments.
“ Default compatibility settings change the preselected virtual Hardware version.”
Virtual Hardware retro-compatibility
Now the issue at hand, which is the topic of this blog, occurs when a VM has been upgraded to a newer version and needs to be powered on or moved to a host running an older version of vSphere.
Such VM cannot run on a host running a version inferior to its compatibility level. For instance, a VM that was upgraded to the latest hardware version 19 on a vSphere 7.0 Update 2 host will not be able to power on or be migrated to a host running vSphere 7.0 Update 1 or older, even powered off.
“ Hosts running an older version of vSphere appear as not compatible in the VM migration wizard.”
In order to get this screenshot, I removed a VM from a vSphere 7u2 host and added it manually on a vSphere 7u1.
“ A VM in version 19 (vSphere 7 U2) cannot run on a host running vSphere 7 U1.”
In the next section, we will briefly cover how to upgrade the virtual hardware after which we will demonstrate 4 ways to downgrade it.
VM Hardware Upgrade
In order to avoid running into the very issue we are covering here, do not upgrade your VMs unless all the hosts in the cluster are running the same vSphere version. Also, note that you should always update the VMware Tools before the compatibility as they may include drivers for potential new virtual hardware.
vSphere Client
Interactive
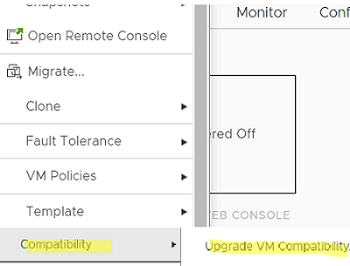
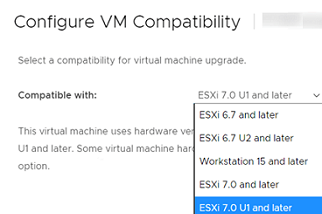
Upgrade the compatibility of a VM is as easy as it gets. When the VM is powered off, right-click on it and hit “ Upgrade VM Compatibility ”. You can then select a compatibility level; you don’t have to go for the latest one thankfully.
“ VM compatibility can be upgraded in powered off state but cannot be downgraded.”
Scheduled
As you can tell in the screenshot above, you can also schedule the task which makes it more convenient if you have a large number of VMs. Although scheduling is a bit misleading a term in this context in that the VM will be upgraded the next time it is powered on.
You can of course cancel the upgrade scheduling should you want to keep it at the current level or select a different compatibility level.
“ Schedule compatibility upgrade to have it run at the next power cycle.”
PowerCLI
Upgrading the compatibility can also be done quickly through the API using the embedded PowerCLI cmdlets.
Interactive
Note that the “ Version” property is now deprecated and doesn’t support versions above v14.
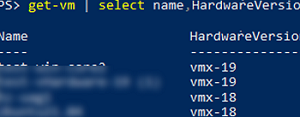
| Get-VM | select name,hardwareversion |
“ Get the versions of all VMs with the ‘HardwareVersion’ property.”
Again, use the “ -HardwareVersion” parameter which takes “ vmx-xx ” arguments, instead of “ -Version” which uses “ vxx ”. It sounds confusing but it’s a PowerCLI things that happens quite often.
“ Use the new ‘HardwareVersion’ property and parameter as ‘Version’ is deprecated.”
If the version supplied is not supported by the ESXi host, the cmdlet will throw an “ operation is not supported on the object ” error as shown next. It’s a bit of a catch-all exception but it’s usually due to an unsupported version in this instance.
“ Invalid Compatibility versions will throw an exception.”
Scheduled
Scheduling the upgrade in PowerCLI isn’t as straightforward as in the vSphere Client as you need to create and work with a specific class of object. To simplify it I created a function out of it but you’ll still get the gist of how it works.
Note that it can take multiple VM objects as arguments (because of “[]” in the type section) so watch how you feed it.
